데브림의 블로그 포스팅 한 것들을 한 눈에 확인하고 싶다면 클릭!
👉 https://github.com/DevLimK1/tistory-map 👈
저번에
Spring IoC(Inversion of Control) 컨테이너에 대해 코드를 통해 쉽게 이해해보자"
라는 주제로 포스팅을 했었다.
오늘은 IoC컨테이너를 통해서 bean 객체를 만드는 과정에 대해서 살펴보겠다.
Spring에서는 사용할 Bean 객체를 bean configuration file(XML파일) 에 정의를 하고
필요할 때 객체를 가져와 사용하는 방법을 이용한다.
<bean> 태그는 사용할 bean을 정의하는 태그
<bean> 태그의 기본 속성 4가지를 실습코드와 함께 살펴보겠다.
▶ class : 객체를 생성하기 위해 사용할 클래스를 지정
▶ id : bean 객체의 주소값을 가져오기 위해 사용하는 이름을 지정
▶ lazy-init : xml을 로딩할 때 객체 생성 여부를 설정
▷ false(기본값) : xml 파일 로딩할 때 자동으로 객체 생성됨
▷ true : xml 로딩할 때 객체를 자동으로 생성하지 않고 getBean으로 가져올 때 생성
▶ scope : 객체의 범위를 설정
▷ singleton : 객체를 하나만 생성
▷ prototype : 객체를 getBean 할 때 마다 생성 (새로운 주소값 부여)
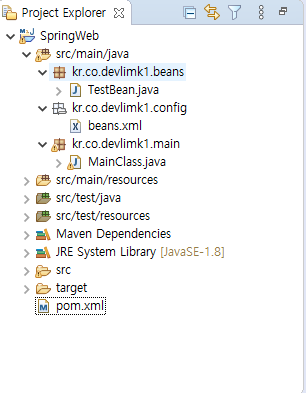
class 속성 설정한 방법
객체를 생성하기 위해 사용할 클래스를 지정

   1: package kr.co.devlimk1.main;
   2:
   3: import org.springframework.context.support.ClassPathXmlApplicationContext;
   4:
   5: public class MainClass {
   6: 	public static void main(String[] args) {
   7: 		ClassPathXmlApplicationContext ctx= new ClassPathXmlApplicationContext("kr/co/devlimk1/config/beans.xml");
   8:
   9: 		ctx.close();
  10: 	}
  11: }
1: package kr.co.devlimk1.beans;
2:
3: public class TestBean {
4: public TestBean() {
5: System.out.println("TestBean의 생성자");
6: }
7: }
<beans.xml 파일>

   1: <?xml version="1.0" encoding="UTF-8"?>
   2: <beans xmlns="http://www.springframework.org/schema/beans"
   3: 	xmlns:xsi="http://www.w3.org/2001/XMLSchema-instance"
   4: 	xsi:schemaLocation="http://www.springframework.org/schema/beans
   5: 						http://www.springframework.org/schema/beans/spring-beans.xsd">
   6:
   7:
   8: 	<!-- xml을 로딩할 때 자동으로 객체가 생성된다. -->
   9: 	<bean class="kr.co.devlimk1.beans.TestBean"/>
  10: </beans>
id 이용방법
IoC가 가지고 있는 객체의 주소값을 받으려면
id라는 속성이 있어야한다.
+) 참고로, 스프링에는 자동 주입이라는 개념이 있다.
getBean 메소드를 통해서 객체의 주소값을 직접 받아오는게 아니고
참조 변수를 설정해놓으면 객체의 주소값이 자동으로 주입되는 작업을 할 수 있다.
위의 자동 주입 방식의 작성 방법에는 id가 필요없다.
지금 실습하는 것은 자동주입하는 방법으로 작성 하는 것이 아니기 때문에 id가 필요하다.
   1: <?xml version="1.0" encoding="UTF-8"?>
   2: <beans xmlns="http://www.springframework.org/schema/beans"
   3: 	xmlns:xsi="http://www.w3.org/2001/XMLSchema-instance"
   4: 	xsi:schemaLocation="http://www.springframework.org/schema/beans
   5: 						http://www.springframework.org/schema/beans/spring-beans.xsd">
   6:
   7:
   8: 	<!-- xml을 로딩할 때 자동으로 객체가 생성된다. -->
   9: 	<bean class="kr.co.devlimk1.beans.TestBean"/>
  10:
  11: 	<!-- xml을 로딩할 때 자동으로 객체가 생성된다.  -->
  12: 	<!-- id 속성에 이름을 부여하면 getBean 메소드를 통해 객체의 주소값을 받아 사용할 수 있다.  -->
  13: 	<bean id="test1" class="kr.co.devlimk1.beans.TestBean"/>
  14:
  15: </beans>
1: package kr.co.devlimk1.main;
2:
3: import org.springframework.context.support.ClassPathXmlApplicationContext;
4:
5: import kr.co.devlimk1.beans.TestBean;
6:
7: public class MainClass {
8: public static void main(String[] args) {
9: ClassPathXmlApplicationContext ctx= new ClassPathXmlApplicationContext("kr/co/devlimk1/config/beans.xml");
10:
11:
12: //id가 test1인 bean 객체의 주소값을 받아온다.
13: TestBean t1=ctx.getBean("test1",TestBean.class);
14: System.out.println("t1: "+t1);
15:
16: ctx.close();
17: }
18: }
bean 태그에 id="test1" 을 설정하고, MainClass에서 getBean메소드로 주소값을 받아온다.

두개의 생성자를 호출해보았다. 객체의 주소값이 동일하다 , 생성된 객체는 더이상 생성되지 않는다(Singleton)
lazy-init
xml을 로딩할 때 객체 생성 여부를 설정한다.
   1: <?xml version="1.0" encoding="UTF-8"?>
   2: <beans xmlns="http://www.springframework.org/schema/beans"
   3: 	xmlns:xsi="http://www.w3.org/2001/XMLSchema-instance"
   4: 	xsi:schemaLocation="http://www.springframework.org/schema/beans
   5: 						http://www.springframework.org/schema/beans/spring-beans.xsd">
   6:
   7:
   8: 	<!-- xml을 로딩할 때 자동으로 객체가 생성된다. -->
   9: 	<bean class="kr.co.devlimk1.beans.TestBean" />
  10:
  11: 	<!-- xml을 로딩할 때 자동으로 객체가 생성된다. -->
  12: 	<!-- id 속성에 이름을 부여하면 getBean 메소드를 통해 객체의 주소값을 받아 사용할 수 있다. -->
  13: 	<!-- 생성된 객체는 더이상 생성되지 않는다. Singleton -->
  14: 	<bean id="test1" class="kr.co.devlimk1.beans.TestBean" />
  15:
  16: 	<bean id="test2" class="kr.co.devlimk1.beans.TestBean" />
  17:
  18: </beans>
19: 
xml파일이 로딩될 때 3개의 생성자가 자동으로 호출되어 console에 출력되는 것을 알 수 있다.

lazy-init="true" 속성을 사용하니, xml을 로딩할 때 객체가 생성되지 않는다.
위 내용을 토대로 false가 default 값인 것을 알 수 있다.

getBean 메소드를 호출할 때 객체가 생성되며, singleton 이기 때문에 객체가 하나만 생성된다.
scope 방법
객체의 범위를 설정하기위해 사용
singleton : 객체를 하나만 생성
prototype : 객체를 getBean 할 때 마다 생성 (새로운 주소값 부여)
   1: <?xml version="1.0" encoding="UTF-8"?>
   2: <beans xmlns="http://www.springframework.org/schema/beans"
   3: 	xmlns:xsi="http://www.w3.org/2001/XMLSchema-instance"
   4: 	xsi:schemaLocation="http://www.springframework.org/schema/beans
   5: 						http://www.springframework.org/schema/beans/spring-beans.xsd">
   6:
   7:
   8: 	<!-- scope : prototype 이면 xml을 로딩할 때 객체가 생성되지 않는다.  -->
   9: 	<!-- getBean 메소드를 호출할 때 마다 새로운 객체를 생성해서 반환한다. -->
  10: 	 <bean id="test3" class="kr.co.devlimk1.beans.TestBean" scope="prototype" />
  11: </beans>
1: package kr.co.devlimk1.main;
2:
3: import org.springframework.context.support.ClassPathXmlApplicationContext;
4:
5: import kr.co.devlimk1.beans.TestBean;
6:
7: public class MainClass {
8: public static void main(String[] args) {
9: ClassPathXmlApplicationContext ctx= new ClassPathXmlApplicationContext("kr/co/devlimk1/config/beans.xml");
10:
11: //id가 test3인 bean 객체의 주소값을 받아온다.
12: TestBean t5=ctx.getBean("test3",TestBean.class);
13: System.out.println("t5: "+t5);
14:
15: TestBean t6=ctx.getBean("test3",TestBean.class);
16: System.out.println("t6: "+t6);
17:
18: ctx.close();
19: }
20: }
21: 
객체를 호출할 때마다 새로운 주소값의 객체가 생성되는 것을 확인할 수 있다.
정리
☞ 사용할 객체를 하나만 만들어서 계속 재사용하겠다하면 singleton 으로 설정
☞ 내가 원하는만큼 새로운 객체를 만들어서 사용하겠다하면 prototype으로 설정
☞ 나는 singleton으로 쓸건데 내가 필요할 때 객체를 생성하겠다하면 lazy-init=true로 설정
[참고자료 및 사이트]
긴 글 끝까지 읽어주셔서 감사합니다 : )
TIL 포스팅은 강의, 블로그, 서적 등을 참고해서 지식을 습득하고, 이해한 것을 바탕으로 정보를 공유합니다.
포스팅에 문제가 있거나, 수정이 필요한 부분 , 질문이 있으시면 댓글 남겨주세요.
도움이 되셨다면 공감(♥)버튼, 댓글은 작성자에게 큰 힘이 됩니다.


댓글